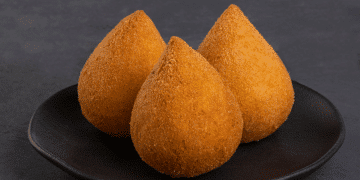
HOW TO MAKE CRISPY BRAZILIAN COXINHA: THE ULTIMATE HOMEMADE RECIPE
Introduction: Mastering the Perfect Brazilian Coxinha
Coxinha is considered one of the most traditional and popular snacks in Brazil. It is commonly served at birthday parties, family celebrations, social events, bakeries, and informal gatherings.
Although this savory snack is widely loved, many home cooks believe that preparing coxinha from scratch is complicated. It is also often assumed that homemade coxinhas cannot achieve the same flavor, texture, and appearance found in Brazilian bakeries.
However, when the correct preparation methods are followed and quality ingredients are selected, golden and crispy coxinhas can easily be made at home.
Additionally, homemade preparation allows every detail to be customized. The seasoning can be adjusted, different fillings may be tested, and the size of each coxinha can be controlled according to personal preference.
Throughout this complete guide, every stage of the recipe will be explained, from organizing the ingredients and preparing the filling to shaping, coating, and frying the coxinhas correctly.
You will also discover the small techniques that transform an ordinary homemade snack into a memorable coxinha that guests will want to enjoy again.
1. Ingredients Required for the Recipe
For the Chicken Filling:
- 1.1 lb cooked, seasoned, and shredded chicken breast
- 2 medium sweet potatoes, peeled and cut into pieces
- 2 medium white potatoes, peeled and chopped
- 1 medium onion, finely diced
- 3 garlic cloves, finely minced
- 2 tablespoons extra virgin olive oil
- 1 teaspoon salt, or according to taste
- ½ teaspoon ground black pepper
- ½ cup homemade chicken stock or filtered water
- 1 tablespoon finely chopped fresh parsley
- 1 tablespoon chopped fresh green onions
For the Coxinha Dough:
- 3 cups chicken stock, or water mixed with 1 chicken bouillon cube
- 1 teaspoon salt
- 2 tablespoons olive oil
- 2 cups whole wheat flour, or 1½ cups all-purpose flour combined with ½ cup whole wheat flour
- 2 large eggs
For Coating and Deep-Frying:
- 2 cups all-purpose flour, used for coating
- 3 eggs, lightly beaten
- Vegetable, sunflower, or canola oil, in a sufficient amount for frying
- Fine salt, used for finishing
2. Recommended Cooking Equipment
For more consistent and professional-looking results, the necessary kitchen tools should be organized before the preparation begins.
The following items are especially helpful:
- Silicone coxinha mold
- Stainless steel potato masher or potato ricer
- Digital cooking thermometer
- Deep, heavy-bottomed saucepan
- Slotted spoon or spider skimmer
- Paper towels or a clean absorbent kitchen cloth
- Glass mixing bowls
3. Preparing the Chicken and Potato Filling
Step 1: Cook the Potatoes
Place the chopped white potatoes and sweet potatoes inside a large saucepan and cover them with cold water.
Next, bring the water to a boil over medium-high heat. The potatoes should be cooked for approximately 15 minutes or until they become completely tender.
They will be ready when a fork can be inserted without resistance.
Once cooked, the potatoes should be thoroughly drained with a stainless steel strainer.
This stage should not be overlooked. When too much water remains in the potatoes, the filling may become excessively moist, sticky, and difficult to handle during shaping.
Step 2: Cook and Shred the Chicken
While the potatoes are being prepared, the chicken can be cooked.
When raw chicken breast is being used, place it in a saucepan with lightly salted water. Allow it to cook for approximately 20 minutes or until the center is completely cooked.
Afterward, let the chicken cool slightly. It should then be shredded with two forks until the fibers are well separated.
Pre-cooked shredded chicken may also be used to save time. Nevertheless, chicken prepared at home usually provides greater control over freshness, sodium levels, seasoning, and final texture.
Step 3: Sauté the Onion and Garlic
Heat the extra virgin olive oil in a large skillet over medium heat.
Add the finely chopped onion and sauté it for approximately two minutes. It should become soft, translucent, and lightly golden.
Next, add the minced garlic and cook it for another minute, or only until its aroma is released.
This basic combination of onion and garlic creates a flavorful foundation and helps enhance every other ingredient in the filling.
Step 4: Combine the Filling Ingredients
Add the drained potatoes to the skillet containing the sautéed onion and garlic.
Using a potato masher or fork, mash the ingredients together until a thick and creamy consistency is obtained.
The mixture does not need to become perfectly smooth. In fact, a slightly textured filling can provide a more traditional and rustic result.
Next, add the shredded chicken, chicken broth, parsley, and green onions.
Everything should be mixed carefully until the chicken and seasonings have been evenly distributed throughout the potato mixture.
Step 5: Adjust the Seasoning and Allow It to Cool
Taste the filling and add more salt or black pepper when necessary.
Because the coxinha dough has a relatively mild flavor, the filling should be properly seasoned and slightly more intense.
After the seasoning has been adjusted, allow the filling to cool completely.
It may be left at room temperature for approximately 30 minutes or refrigerated for about one hour.
A cold filling is easier to portion and shape. Furthermore, chilled filling reduces the possibility of the coxinhas splitting open while being fried.
4. Preparing the Coxinha Dough
Step 1: Bring the Broth to a Boil
Add the chicken broth, salt, and olive oil to a medium saucepan.
Heat the mixture until a full boil is reached.
Step 2: Gradually Incorporate the Flour
Place the flour inside a large heat-resistant mixing bowl.
Slowly pour the hot broth over the flour while stirring continuously with a wooden spoon.
The liquid should be added gradually so that lumps are less likely to develop.
Continue stirring until a thick and soft dough is formed. Its consistency should resemble creamy mashed potatoes.
The dough should not be overly dry, but it should also not become liquid or difficult to hold.
Step 3: Mix in the Eggs
Allow the dough to cool for approximately five minutes.
It should remain warm, although it must no longer be hot enough to cook the eggs immediately.
Add the beaten eggs and mix thoroughly until they have been fully absorbed.
At this stage, the dough should feel soft, creamy, smooth, and manageable.
Step 4: Rest the Dough
Leave the prepared dough at room temperature for approximately 15 minutes.
During this resting period, the flour will continue absorbing the liquid. As a result, the dough will become firmer and easier to shape.
5. How to Shape the Coxinhas
Method 1: Shaping with a Silicone Mold
A silicone mold is one of the easiest options for beginners and also helps produce coxinhas with a consistent size and appearance.
Follow these steps:
- Add approximately 1 tablespoon of dough to the mold
- Place 1 teaspoon of chicken filling in the center
- Cover the filling with another tablespoon of dough
- Press gently until the edges are completely sealed
- Carefully remove the shaped coxinha from the mold
- Transfer it to a clean plate
Uniform sizing is especially important because coxinhas of similar dimensions will cook at approximately the same speed.
Method 2: Traditional Hand-Shaping
When a mold is unavailable, the coxinhas can be shaped manually.
Follow this method:
- Lightly moisten your hands with cold water
- Place approximately 1 tablespoon of dough in the palm of your hand
- Press the center gently to create a small cavity
- Add 1 teaspoon of filling
- Carefully close the dough around the filling
- Shape the dough into a traditional teardrop or pointed cone
- Place the finished coxinha on a plate
Although manual shaping requires additional practice, greater control over the size, thickness, and final shape can be achieved.
Important Preparation Tip
After all the coxinhas have been shaped, they should be refrigerated for at least 30 minutes.
This additional chilling period helps the dough become firmer and significantly reduces the risk of the snacks opening when placed in hot oil.
6. Preparing the Coxinhas for Frying
Step 1: Organize the Coating Station
Place the all-purpose flour in a shallow bowl.
In a separate bowl, beat the eggs with a fork until they become smooth and evenly blended.
Step 2: Coat Each Coxinha
Remove the chilled coxinhas from the refrigerator.
Each one should first be rolled in flour, dipped into the beaten eggs, and then coated in flour for a second time.
This double-layer method creates a thicker outer coating and produces a more noticeable crunch after frying.
Once coated, arrange the coxinhas on a clean plate and let them rest for approximately 10 minutes.
By allowing the coating to settle, it will adhere more securely during frying.
Step 3: Heat the Frying Oil
Pour the chosen frying oil into a heavy-bottomed saucepan.
Heat it over medium-high heat until the temperature reaches between 340°F and 355°F.
A digital kitchen thermometer is recommended because accurate temperature control is essential.
When a thermometer is unavailable, a small piece of bread may be placed in the oil. If it becomes golden in approximately one minute, the oil should be ready.
7. How to Fry Coxinhas Correctly
Step 1: Work in Small Batches
Avoid placing too many coxinhas in the pan at the same time.
Instead, fry between four and six pieces per batch.
When the saucepan becomes overcrowded, the oil temperature may drop quickly. Consequently, the coating may absorb additional oil and become heavy instead of crispy.
Step 2: Control the Frying Time
Allow each batch to fry for approximately three to four minutes.
The coxinhas should become evenly golden, firm, and crispy on the outside.
Using a slotted spoon or spider strainer, turn them gently so that every side is browned.
Step 3: Remove and Drain the Coxinhas
Once the desired golden color has been reached, remove the coxinhas from the oil with a slotted spoon or strainer.
Transfer them immediately to a plate lined with paper towels or a clean absorbent kitchen towel.
Any excess frying oil will then be removed.
Step 4: Add Salt While Hot
Sprinkle a small amount of fine salt over the coxinhas immediately after frying.
The salt adheres more effectively while the outer surface is still hot and slightly oily.
8. Storage, Refrigeration, and Freezing Instructions
Serving Immediately
Freshly fried coxinhas are best served hot.
For the crispiest texture and freshest flavor, they should preferably be consumed within the first 30 minutes after frying.
Refrigerating Leftover Coxinhas
Leftover coxinhas can be placed in an airtight container and refrigerated for up to three days.
To restore their crispy texture, reheat them in a preheated 350°F oven for approximately 10 minutes.
They should be heated until the center is warm and the coating has become crisp again.
Freezing Coxinhas
Uncooked coxinhas that have already been coated can be frozen for up to two months.
Arrange them separately on a baking tray and freeze until firm. Afterward, they can be transferred to a sealed freezer-safe container or bag.
When frying frozen coxinhas, thawing is not required.
They may be placed directly into the hot oil. However, approximately one additional minute should be added to the normal frying time.
This method is particularly useful for busy days, parties, or unexpected visitors because a homemade snack can be prepared quickly whenever needed.
9. Coxinha Filling Variations and Recipe Ideas
Chicken Coxinha with Cream Cheese
For a smoother and richer filling, mix approximately two tablespoons of cream cheese into the prepared chicken mixture.
The cream cheese adds moisture, creaminess, and a slightly tangy flavor.
Vegetarian Coxinha
Replace the chicken with approximately 10 ounces of chopped mushrooms that have been sautéed until their excess liquid is removed.
The remaining ingredients and preparation steps may be kept unchanged.
This variation produces a hearty, flavorful, and satisfying meat-free coxinha.
Shrimp Coxinha
Cooked and finely chopped shrimp can be used instead of shredded chicken.
This version has a more sophisticated flavor and can be served at special events or formal gatherings.
Whole Wheat Coxinha
For a dough containing additional fiber, all-purpose flour can be fully replaced with whole wheat flour.
However, the texture may become slightly denser.
A mixture of half all-purpose flour and half whole wheat flour usually provides a balanced combination of softness, structure, and nutritional value.
10. Professional Techniques for Better Coxinha Results
Maintain the Correct Oil Temperature
Frying temperature plays an essential role in the final texture.
When the oil is excessively hot, the coating may brown or burn before the filling has been properly heated.
On the other hand, when the oil is not hot enough, too much oil may be absorbed, leaving the coxinhas greasy and heavy.
For this reason, a digital kitchen thermometer is one of the most reliable tools for achieving consistent results.
Keep the Filling and Dough Chilled
Both the filling and the dough should be cool before the coxinhas are shaped.
The formed coxinhas should also be refrigerated before coating and frying.
When the ingredients are properly chilled, the dough becomes easier to handle and the coxinhas are more likely to maintain their shape.
Avoid Turning Them Too Frequently
The coxinhas should not be moved continuously immediately after being placed in the oil.
Instead, allow the outer layer to become firm before turning them gently.
This helps prevent cracks and keeps the coating intact.
Eliminate Excess Moisture
The cooked potatoes should be completely drained before they are added to the filling.
A potato ricer, fine strainer, or absorbent kitchen towel may be used when necessary.
Excessive moisture may soften the dough, weaken the structure, and make shaping more difficult.
Use a Silicone Mold for Uniformity
A silicone mold can be especially helpful when a large quantity of coxinhas is being prepared.
Because the pieces are formed with similar dimensions, they can be fried more evenly and presented more professionally.
Taste the Filling Before Shaping
Always taste the prepared filling before assembling the coxinhas.
Once the snacks have been shaped and fried, correcting the seasoning will no longer be possible.
Therefore, salt, pepper, herbs, and other seasonings should be adjusted in advance.
11. Frequently Asked Questions
Can Coxinha Be Prepared Without Deep-Frying?
Yes.
The coated coxinhas may be arranged on a baking sheet and baked in a preheated 400°F oven for approximately 20 minutes.
They should be baked until the exterior becomes firm and golden.
Although baked coxinha is generally lighter, the coating will not become as crunchy as the traditional fried version.
How Long Does It Take to Make Coxinha?
When the cooking, cooling, resting, shaping, coating, and frying times are included, the entire preparation usually takes approximately two hours.
However, when the filling is prepared in advance, the remaining process may be completed in about one hour.
Can Only All-Purpose Flour Be Used?
Yes.
The dough may be prepared entirely with all-purpose flour.
Nevertheless, whole wheat flour provides additional fiber and nutrients.
Combining both types of flour is often recommended because a softer texture can be maintained while some nutritional benefits are added.
Is Fried Coxinha Better Than Baked Coxinha?
Traditional fried coxinha generally has a crispier coating and a more familiar bakery-style flavor.
Baked coxinha, meanwhile, is lighter and may be easier to prepare in larger quantities.
Therefore, the best preparation method will depend on the desired texture and personal preference.
Which Oil Is Best for Frying Coxinha?
Canola, sunflower, and standard vegetable oils are all suitable choices.
These oils have relatively neutral flavors and can tolerate the temperatures required for deep-frying.
Extra virgin olive oil is not recommended for this method because it is more expensive, has a stronger flavor, and may not perform as well during prolonged high-temperature frying.
Can Vegetable Broth Be Used in the Dough?
Yes.
Chicken broth can be replaced with vegetable broth without significantly changing the preparation method.
The dough will have a slightly different flavor, but it will still work properly.
Vegetable broth is also an excellent choice when vegetarian coxinhas are being prepared.
Conclusion
Learning how to prepare coxinha at home can be a valuable cooking skill, especially when snacks are needed for birthday parties, celebrations, family gatherings, or casual visits.
By following the techniques presented in this guide, golden and flavorful coxinhas with a crunchy coating and generous filling can be produced in a home kitchen.
Ultimately, the best results are achieved when three essential details are respected: the frying oil must remain at the correct temperature, the dough and filling must be given enough time to cool and rest, and fresh, high-quality ingredients should be used.
Helpful equipment, including a digital cooking thermometer and a silicone coxinha mold, can simplify the preparation and create more consistent results.
With patience and regular practice, homemade coxinhas can soon become one of the most requested recipes among your friends and family.